Cabinet Painting and Restoring a Butcher Block Countertop in La Jolla
Last Updated: August 15, 2015
Bringing Fresh Life to Tired Surfaces!
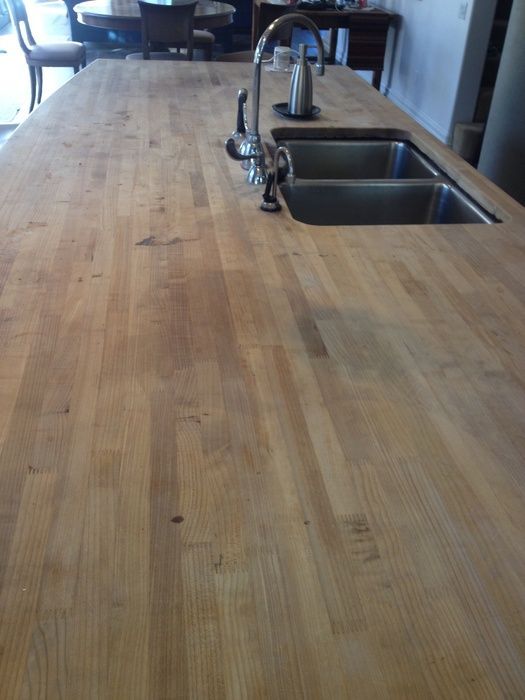
If the photos of the butcher block countertop above look at all familiar, there’s a very good reason for that.
You’ve seen them before!
We put these transformation photos on all of our social channels a few weeks ago, hoping to show how quality craftsmanship can restore surfaces that seem far gone. There can be a lot of potential hiding under those dings, gouges, marks, and splatters.
The photos were a big hit, and as a result we received a couple of questions about the process used to bring this counter back to the land of the living (and stylish). So, we thought it was high time we share a more behind-the-scenes look at the work that was done.
How Do You Make a Butcher Block Counter Look Fantastic Once Again?
Well, we have a secret ingredient for success that you won’t have around your home: a true craftsman named Marty. We would like to give him credit for his wonderful work here!
When he arrived on the scene, he said that the butcher block could be described as “very dry with many stains and scratches.” So, he started the following process:
Sanding
He used a random orbital sander, beginning with 60 grit. To minimize dust and mess, he attached the sander to a vacuum (clever!). After using 60 grit, he moved progressively to 100, then 150.
In case you aren’t familiar with sanding terms, this essentially means that he moved from a coarse paper to a finer one. This, in turn, creates a smoother and smoother (and cleaner!) surface.
A small detail that matters here: the goal isn’t just to “smooth” the wood. Sanding removes the dry, damaged top layer and levels out stains and shallow gouges so the finish can soak in evenly. Skipping grits or rushing the process can leave swirl marks or uneven areas that show up once the oil hits the surface.
Applying the Finish
The finish he used was specifically formulated for butcher blocks, and included a mineral oil with additive. You can find this at your local home supply store!
It is applied, sits for the prescribed time, then you can wipe off the excess. You can add a few coats of this as the initial layers are soaked into the thirsty wood, but just be careful to not let the excess dry on. It needs to be rubbed away.
This step is where a lot of DIY butcher block refinish jobs go wrong: too much product left on the surface can turn sticky or uneven. The best results usually come from multiple lighter applications, giving the wood time to absorb what it needs, and wiping off the rest.
The beauty of a simple finish like this is that it can be reapplied as needed to keep that glistening, beautiful shine.
Cabinet Painting: A Color Change That Makes the Whole Kitchen Feel New
As you can see from the photos, the cabinet color also changed. They were originally a red lacquer, but we changed them to a blue acrylic paint offered by PPG.
When you pair warm wood tones (like butcher block) with a new cabinet color, you can get a dramatic change without changing the layout of the kitchen. It’s one of those upgrades that people notice immediately because it refreshes the entire space at eye level.
Does your butcher block need refinishing?
If your countertop is looking dry, stained, or worn down, Chism Brothers Painting can help you understand what is restorable and what a practical kitchen update could look like. Contact our team to talk through your butcher block refinishing and cabinet painting goals.
Tell us about your project
Tell Us About Your Project


Contact us today to schedule a visit from one of our estimators! We’ll come to your home and provide a detailed estimate.
(858) 454-3850
